


| Class Information |
| Program Coordinator: Marla Marx 308-641-3488 |
| Cancellation policy: Except in the case of emergency, no refunds will be given. Please contact Program Coordinator ASAP if you must cancel. See Standing Rule 1.A. for further explanation of either Policy. |
| January 17, 2026 - Following the meeting until 4 : Pickled Orange Peel by Emma Jean Jansen, taught by Sharon Armstrong at Platte Valley Bank Community Center, 1106 Platte Valley Drive, Scottsbluff | |
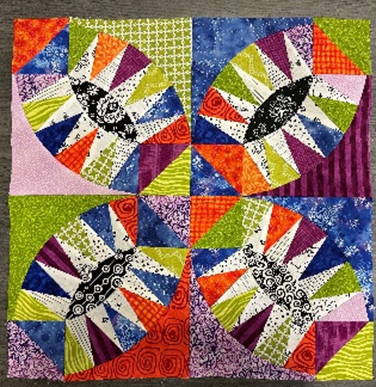 | Sharon will instruct us on tips and tricks to create the arcs and sew the curves on this traditional block with a modern twist.
Digital pattern and acrylic templates may be ordered from pattern designer at:
https://www.emmajeanjansen.com.au/
Class Supplies
Printed copy of the pattern. I am teaching this class using traditional paper piecing on foundation papers. Set of 8 foundation papers pieces of the arc portion of the design printed and trimmed to about 1/4” all the way around the outside design line. Even if you have the acrylic template, trim the paper as directed, save the acrylic template for the final trim.
Paper templates: Print 3 or 4 copies of the paper template pieces A, B, C, & D (NOT the arcs) on
regular printer paper—these can be reused multiple times.
Fabric. Because we only have one afternoon for the class I would like you all to have your fabrics
precut. Before cutting please starch all your fabrics well.
• Template A Dark fabric Need 48 pieces.
• Template B Light fabric Need 40 pieces.
Both are cut from 4” strips. Recommend having a few extra pieces of both if your going
with a scrappy design.
• Template C (center or melon piece) Need 4, one piece can be cut from 3.5” x 6.25” chunk. If
using the same fabric, a piece 6.25”x14” will suffice.
• Template D (corners) Need 8. An 8” square will give you one. These pieces are most vulnerable to stretchingso handle with care!
• Half square triangle squares (HST). Need 8 HST’s. 2-4”squares will give you 2 identical
HST trimmed to 3.5”sq.
Cutting.
• With acrylic template, cut the numbers needed of each Template as directed above.
• Paper template, cut out the paper templates from the pattern.
Pieces cut from paper Template C & D need to be cut with accuracy, therefore adhere the paper to
the back of fabric with a few light touches of glue to hold secure for cutting. Use rulers for
the straight edge cuts and a your 28mm (small) cutter for the curves. Go slow.
Templates A &B are made oversized so your fabrics can be stacked a few at a time for efficiency.
Cut the 4” squares for the HST’s
Glue stick. Any washable glue stick will work. I use Elmer’s Washable School Glue sticks.
A few straight pins.
2 Small scissors.
A stiletto—not required, but may be useful for controlling pieces while sewing curves.
A seam ripper and a roll of scotch tape. Just in case you get to unsew!
Iron, iron board (or wool mat) and cutting mat. Note: Unfinished block measures 10 1/2” square,
therefore these items do not need to be full sized.
Sewing machine and thread. I like using a thinner thread (50 or 60 wt)
25 mm Rotary cutter—a must for accurately cutting the curved pieces. 40 mm for straight cutting.
Rulers—I like my 4.5” X 18.5” ruler—its big enough but not too big.
This is an abbreviated version, please contact Sharon if you have questions. <<< Back to Classes |
70455 County Road 20 ~ Scottsbluff, Nebraska 69361 ~ 308-631-1116